Building a Step Sequencer with Strudel: Creative Coding Meets Visual Beat-Making

Hello friends, and welcome to another creative coding tutorial!
In the previous tutorial, we explored Strudel — a browser-based creative coding library that lets you make music with code. We wrote drum patterns, melodies, and layered grooves using just a few lines of JavaScript.
If you haven't read that tutorial yet, I recommend checking it out first:

Today, we're going to take things further.
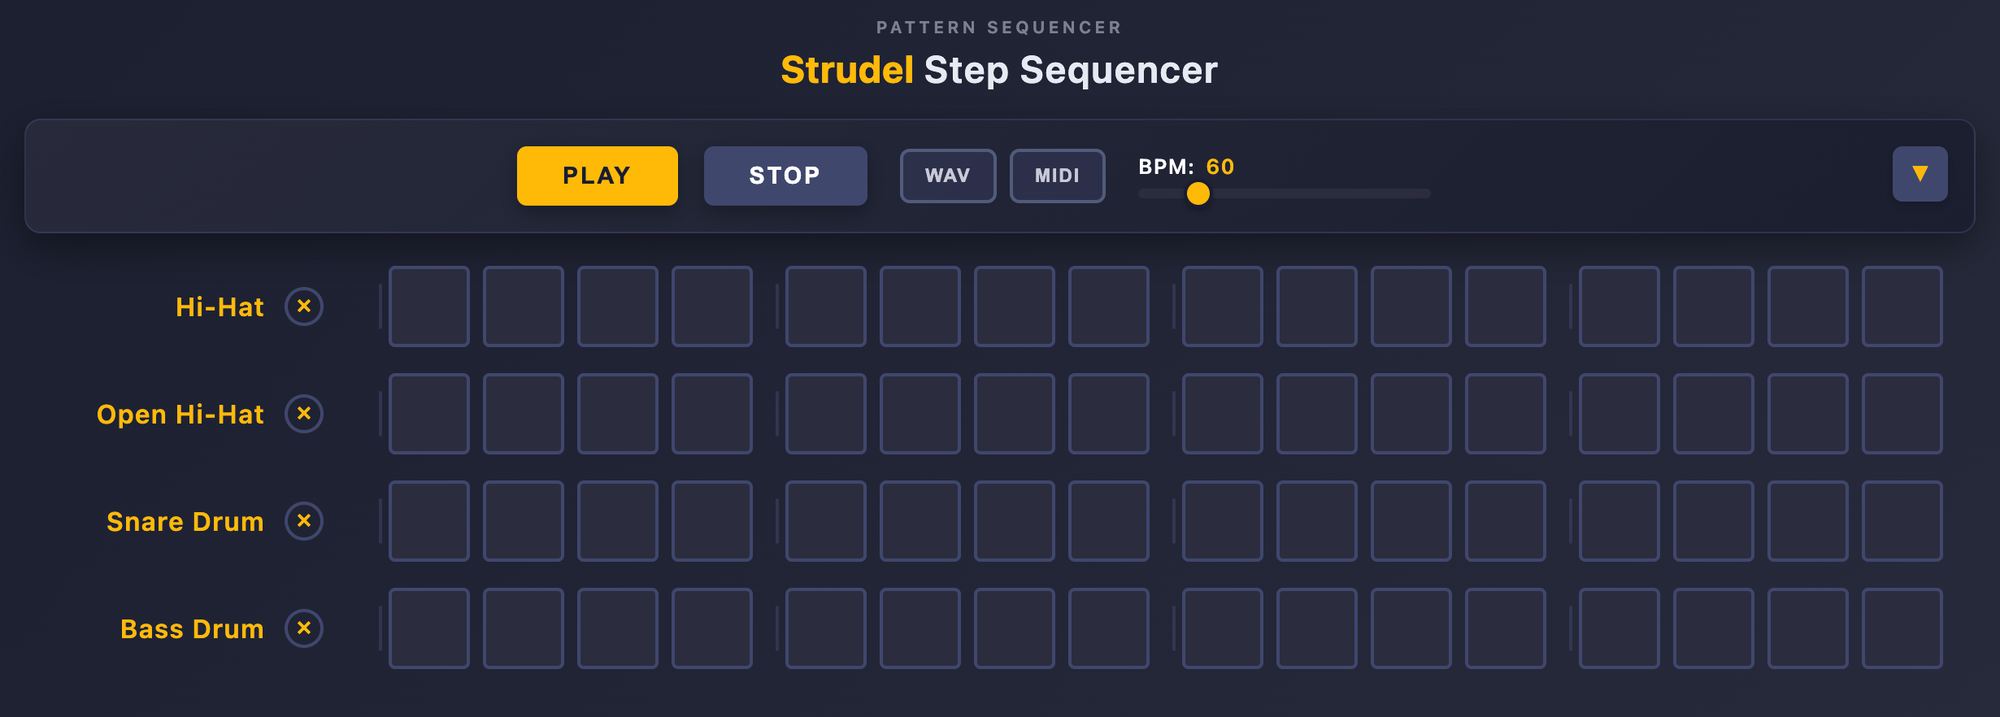
Instead of writing Strudel code by hand, we're going to build a step sequencer — a visual interface where you click on a grid to create drum patterns, and the app generates and plays Strudel code for you behind the scenes.
By the end of this article, you will:
- understand what a step sequencer is and how it works
- see how a clickable grid translates into Strudel patterns
- learn how Strudel functions like
s(),.beat(),.bank(), andstack()power the sequencer - understand how the UI and code work together to produce music
If you've been enjoying creative coding with visuals, this project bridges two worlds: visual interfaces and algorithmic music.
You can find the live step sequencer here, have a look and play around with it:
You can find a link to the source code of this project at the end of the article.
Let's dive in.
What Is a Step Sequencer?
A step sequencer is one of the oldest and most intuitive tools in electronic music.
The idea is simple:
You have a grid. Each row represents a different instrument — bass drum, snare, hi-hat. Each column represents a moment in time — a step.
You click on a cell to activate it. When the sequencer plays, it moves through the columns left to right, triggering the active instruments at each step.
Think of it like a grid of switches. Each switch tells the system: "play this sound at this moment."
Classic drum machines like the Roland TR-808 and TR-909 popularized this approach. Now, we're building the same concept in the browser — powered by Strudel.
How Our Step Sequencer Works
Our step sequencer is a small vanilla JavaScript app that connects a visual grid to Strudel's pattern engine.
Here's what happens when you interact with it:
- You see a grid of rows (instruments) and columns (steps)
- You click on steps to activate them
- When you press play, the app reads the grid and builds Strudel patterns
- Strudel plays those patterns as sound
The entire app is built with three files: index.html, main.js, and main.css. No frameworks, no build tools — just code and a creative coding library.
Let's break down each part.
Loading Strudel in the Browser
The first step is loading Strudel itself. We include it directly from a CDN:
<script src="https://unpkg.com/@strudel/web@latest"></script>
This gives us access to all of Strudel's functions — s(), stack(), hush(), and more — as global JavaScript functions.
Next, we initialize Strudel and load drum machine samples:
initStrudel({
  prebake: () => loadSamples()
});

async function loadSamples() {
  const ds = "https://raw.githubusercontent.com/felixroos/dough-samples/main/";
  return Promise.all([
    samples(`${ds}/tidal-drum-machines.json`),
  ]);
}
The initStrudel() function sets everything up. The prebake option tells Strudel to load our samples before anything else — in this case, a collection of classic drum machine sounds from machines like the Roland TR-909, TR-808, LinnDrum, and many more.
Once this runs, we have a library of drum sounds ready to play with code.
Building the Grid: Instruments and Steps
The heart of the step sequencer is the StepSequencer class. When it initializes, it creates the grid.
Each instrument gets a row:
this.instruments = ["hh", "oh", "sd", "bd"];
These abbreviations map to drum sounds that Strudel understands:
bd→ Bass Drumsd→ Snare Drumhh→ Hi-Hatoh→ Open Hi-Hat
The number of columns (steps) depends on the time signature. In 4/4 time, we get 16 steps — four beats, with four subdivisions each:
this.measure = 4;
this.stepsPerBeat = 4;
this.stepsPerCycle = this.measure * this.stepsPerBeat; // 16
For each instrument, the app creates a row of clickable step cells:
for (let i = 0; i < this.stepsPerCycle; i++) {
    const step = document.createElement('div');
    step.classList.add('step', `step-${i}`);
    step.addEventListener('click', () => this.toggleStep(instrument, i));
    stepContainer.appendChild(step);
}
When you click a step, it toggles an active class on that cell:
toggleStep(instrument, step) {
    const stepElement = this.container.querySelector(
        `div.instrument-row.${instrument} div.step.step-${step}`
    );
    stepElement.classList.toggle('active');
}
That's it. The state of the entire pattern lives in the DOM — each cell is either active or not. There is no separate data model. The grid is the data.
This keeps things simple. When it's time to play, the app reads the grid directly to figure out which steps are on.
From Clicks to Code: How the Grid Becomes Strudel
This is where things get interesting.
When you press play, the step sequencer needs to translate the visual grid into something Strudel can understand.
Here's the play() method — the core of the entire app:
play() {
    hush();

    const patterns = this.instruments.map(instrument => {
        const steps = this.container.querySelectorAll(
            `div.instrument-row.${instrument} div.step`
        );
        const activeBeats = Array.from(steps)
            .map((step, i) => step.classList.contains('active') ? i : null)
            .filter(beat => beat !== null)
            .join(',');

        return s(instrument)
            .beat(activeBeats || '-', this.stepsPerCycle)
            .bank(this.bank)
            .cpm(this.bpm);
    });

    this.patternStack = stack(...patterns);
    this.patternStack.play();
}
Let's break this down step by step.
Step 1: Silence Everything
hush();
Before starting a new pattern, we call hush() — a Strudel function that stops all currently playing sounds. This ensures we always start fresh.
Step 2: Read the Grid
For each instrument, we look at every step in its row and collect the indices of the active ones:
const activeBeats = Array.from(steps)
    .map((step, i) => step.classList.contains('active') ? i : null)
    .filter(beat => beat !== null)
    .join(',');
So if you activate steps 0, 4, 8, and 12 on the bass drum row, activeBeats becomes the string "0,4,8,12".
Step 3: Build a Strudel Pattern
This is where the visual clicks become Strudel code:
return s(instrument)
    .beat(activeBeats || '-', this.stepsPerCycle)
    .bank(this.bank)
    .cpm(this.bpm);
Let's unpack each function:
s(instrument)— Selects a sound.s("bd")means "use the bass drum sample.".beat(activeBeats, stepsPerCycle)— This is the rhythm function. It takes a comma-separated list of step indices and the total number of steps in a cycle. So.beat("0,4,8,12", 16)means "play on steps 0, 4, 8, and 12 out of 16 total steps." If no steps are active, we pass'-'which means silence..bank(this.bank)— Selects the sample bank. For example,"RolandTR909"uses sounds from the classic TR-909 drum machine..cpm(this.bpm)— Sets the tempo in cycles per minute.
Step 4: Layer All Instruments
Finally, we combine all instrument patterns with stack():
this.patternStack = stack(...patterns);
this.patternStack.play();
stack() tells Strudel to play all patterns simultaneously — just like layering tracks in a music production app.
A Practical Example
Let's say you build this pattern on the grid:
- Hi-Hat:
0, 2, 4, 6, 8, 10, 12, 14 - Snare:
4, 12 - Bass Drum:
0, 8
Behind the scenes, the step sequencer generates the equivalent of this Strudel code:
stack(
  s("hh").beat("0,2,4,6,8,10,12,14", 16).bank("RolandTR909").cpm(60),
  s("sd").beat("4,12", 16).bank("RolandTR909").cpm(60),
  s("bd").beat("0,8", 16).bank("RolandTR909").cpm(60)
)
The hi-hat plays on every other step (eighth notes), the snare hits on beats 2 and 4, and the bass drum anchors beats 1 and 3.
A classic drum pattern — built entirely by clicking on a grid.
The beauty here is that you don't need to write any Strudel code yourself. The UI translates your clicks into the exact same pattern objects that Strudel's API understands.
Controls: Tempo, Samples, and Time Signature
The step sequencer gives you more than just the grid. A set of controls at the top lets you tweak how the pattern plays.
Tempo (BPM)
A slider controls the tempo:
updateCpm(newCpm) {
    this.bpm = newCpm;
    if (this.isPlaying) {
        this.play();
    }
}
When you move the slider, the app updates the tempo and restarts the pattern. This value gets passed to Strudel's .cpm() function, so the change takes effect immediately.
Sample Banks
You can switch between different drum machine sample banks — everything from the Roland TR-909 to the LinnDrum, the Oberheim DMX, and many more.
The app fetches the available banks from the same sample library that Strudel uses:
async loadBanks() {
    const ds = "https://raw.githubusercontent.com/felixroos/dough-samples/main/";
    const response = await fetch(`${ds}/tidal-drum-machines.json`);
    const data = await response.json();

    // Extract unique bank names from sample keys
    const banks = new Set();
    Object.keys(data).forEach(key => {
        if (key.includes('_')) {
            const bankName = key.split('_')[0];
            banks.add(bankName);
        }
    });

    this.availableBanks = Array.from(banks).sort();
}
When you select a different bank, every instrument in the sequencer switches to that bank's sounds. Same pattern, completely different character.
Time Signature
You can also switch between 4/4 and 3/4 time:
updateMeasure(newMeasure) {
    this.measure = parseInt(newMeasure);
    this.stepsPerCycle = this.measure * this.stepsPerBeat;
    this.regenerateInstrumentRows();

    if (this.isPlaying) {
        this.play();
    }
}
In 4/4 time, you get 16 steps. In 3/4 time, you get 12 steps. The grid rebuilds itself, and any active steps that still fit within the new count are preserved.
Adding and Removing Instruments
The sequencer starts with four instruments: hi-hat, open hi-hat, snare, and bass drum.
But you're not limited to those. A + button at the bottom lets you add more instruments from a dropdown:
- Ride cymbal
- Low Tom
- Mid Tom
- High Tom
- Crash cymbal
- Clap
Each instrument you add gets its own row in the grid, and it immediately becomes part of the pattern. You can also remove instruments with the × button next to each row.
Every time you add or remove an instrument, the pattern updates:
addInstrument(instrument) {
    if (!this.instruments.includes(instrument)) {
        this.instruments.push(instrument);
        this.addInstrumentRow(instrument);

        if (this.isPlaying) {
            this.play();
        }
    }
}
This means you can build up layers in real time — start with just a kick drum, add hi-hats, throw in a clap, experiment with toms.
The Visual Playhead
When a pattern is playing, a visual highlight sweeps across the grid to show you which step is currently active.
This playhead is driven by a JavaScript timer, separate from Strudel's audio engine:
startHighlight() {
    this.startTime = performance.now();
    const stepDuration = this.getStepDurationMs();

    const tick = () => {
        const elapsed = performance.now() - this.startTime;
        const currentStep = Math.floor(elapsed / stepDuration) % this.stepsPerCycle;
        this.highlight(currentStep);
    };

    tick();
    this.highlightInterval = setInterval(tick, Math.min(stepDuration / 2, 50));
}
The highlight calculates which step we're on based on elapsed time and the tempo, then applies a current CSS class to the corresponding cells.
The result is a moving cursor that visually tracks the rhythm — just like the LEDs on a hardware drum machine.
Why This Matters for Creative Coding
If you've been following along with this blog, you know that creative coding is about more than just running code — it's about building systems that generate creative output.
With visual creative coding, you write rules that produce shapes, colors, and motion.
With Strudel, you write rules that produce rhythms, melodies, and textures.
This step sequencer sits at the intersection.
The grid is the interface. Strudel is the engine. And between them, your clicks become patterns, patterns become code, and code becomes music.
What makes this particularly interesting from a creative coding perspective is that the entire musical composition is described as data. Each pattern is a set of indices, a sample name, a bank, and a tempo. The stack() function layers them together. The system plays the result.
This is the same principle behind generative art: describe rules, let the system produce the output.
The only difference is that instead of drawing pixels, we're triggering sounds.
Try It Yourself
Here are a few things to experiment with:
- Start simple: Activate just a bass drum on steps 0 and 8. Add a snare on 4 and 12. Then layer in hi-hats. Notice how each addition changes the feel.
- Switch banks: Build a pattern with the Roland TR-909, then switch to the TR-808 or LinnDrum. Same rhythm, completely different vibe.
- Try 3/4 time: Switch to a 3/4 time signature and notice how 12 steps changes the rhythmic feel. Waltz-like grooves become possible.
- Go weird: Activate random steps across all instruments. Sometimes the most interesting patterns come from unexpected combinations.
- Think in layers: Start with the lowest sound (bass drum) and work your way up. This is how a lot of electronic music is built — from the ground up.
How This Connects to Strudel
If you've read the Strudel beginner tutorial, you'll notice that the step sequencer uses the exact same Strudel functions we explored there.
The difference is that instead of typing this:
stack(
  s("bd").beat("0,8", 16).bank("RolandTR909").cpm(60),
  s("sd").beat("4,12", 16).bank("RolandTR909").cpm(60),
  s("hh").beat("0,2,4,6,8,10,12,14", 16).bank("RolandTR909").cpm(60)
)
...you click on a grid, and the app builds this for you.
This is one of the most powerful ideas in creative coding: you can build visual interfaces that generate code.
Whether it's a step sequencer that writes Strudel patterns, or a slider panel that adjusts p5.js parameters, the principle is the same. The interface becomes a creative tool that makes the underlying code accessible to anyone — even people who have never written a line of code.
Wrapping Up
In this tutorial, we explored how a step sequencer bridges the gap between visual interfaces and code-based music.
We looked at:
- how the clickable grid stores pattern data
- how the app reads the grid and builds Strudel patterns using
s(),.beat(),.bank(),.cpm(), andstack() - how controls for tempo, sample banks, and time signatures shape the output
- how adding and removing instruments layers patterns in real time
- how a visual playhead tracks the rhythm
The step sequencer is a perfect example of what makes creative coding exciting: building systems where simple interactions produce complex, expressive results.
If you enjoyed this tutorial, try building your own patterns and see what grooves emerge. And if you want to go deeper into Strudel, check out the official Strudel documentation — there's a whole world of pattern manipulation waiting to be explored.
Here is the link to the source code:

Happy coding, and see you in the next tutorial!