Create Animated Metaballs with Shaders in p5.js — A Creative Coding Tutorial

Hey there and welcome to another tutorial about creative coding and generative art. In this tutorial we will look at what SDFs are and how we can use them to create metaballs.
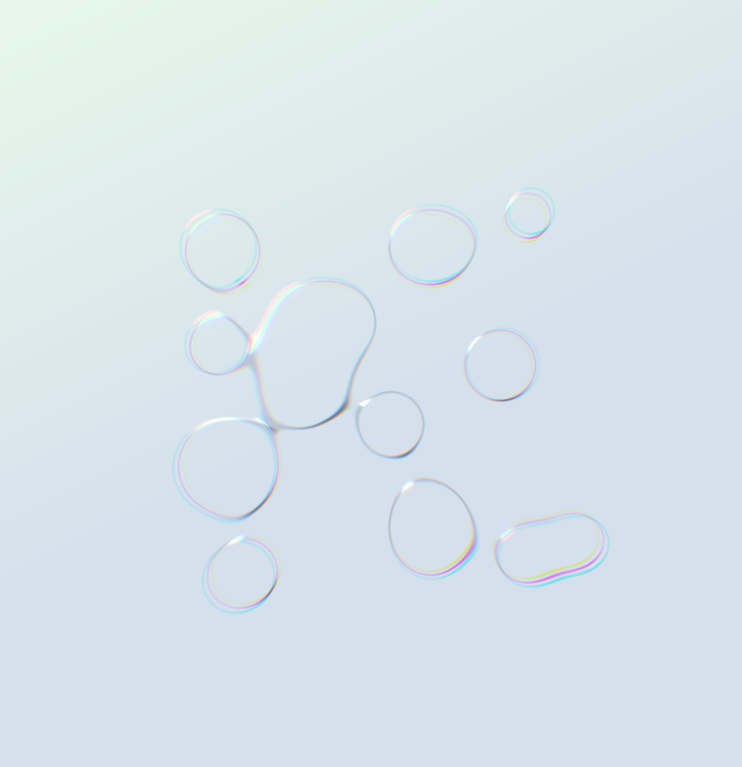
Metaballs are a classic technique in generative art used to create organic, fluid shapes that morph and merge in real time. In this tutorial, you'll learn how to use GLSL shaders, Signed Distance Functions (SDFs), and p5.js to create a customizable and visually striking metaball animation. We'll build up the shader step by step, exploring techniques for smooth blending, animated motion, lighting, and post-processing effects along the way.
Let’s dive in. But first, let's play around with what we are going to create by the end of this tutorial, by tweaking the controls from the right side of the screen (visible on the website only).
What are Shaders & SDFs?
Shaders are tiny programs that run on the GPU. They come in two flavors:
- Vertex shaders decide where shapes go on screen.
- Fragment shaders decide the color of each pixel.
In creative coding, fragment shaders are the magic paintbrush. They run once per pixel and let you draw with pure math.
Signed Distance Functions (SDFs) tell us how far a point is from the surface of a shape:
- Negative = inside
- Zero = on the edge
- Positive = outside
This gives us smooth shapes, outlines, and elegant ways to combine things like our blobby metaballs.
Building the Fragment Shader Step-by-Step
Shader Basics
Before diving deeper, let’s go over a few key concepts that form the backbone of shader programming:
- Main Function: This is the entry point of every fragment shader. It’s where the actual pixel color is calculated and assigned to
gl_FragColor. Think of it like thedraw()function in p5.js, but instead of drawing once per frame, it's executed once per pixel on the screen. Insidemain(), you typically calculate UV coordinates, apply your shader logic (like field strength or lighting), and output the final color. - Uniforms are variables passed into your shader from the outside world (like from your JavaScript sketch). They’re constant across a single draw call. Examples in our shader include
u_resolution,u_time, andu_numMetaballs. - Built-in variables like
gl_FragCoordare provided automatically by the GPU.gl_FragCoord.xygives you the pixel coordinates on the screen, which you often normalize usingu_resolutionto get values between 0.0 and 1.0. - GLSL Data Types:
float: a number with decimals.vec2,vec3,vec4: vectors with 2, 3, or 4 components (used for positions, colors, etc).mat2,mat3,mat4: 2x2, 3x3, or 4x4 matrices.
Understanding these basics helps you read, write, and play with fragment shaders more fluently.
Base Shader (Gradient Background)
#ifdef GL_ES
precision mediump float;
#endif

uniform vec2 u_resolution;

void main() {
  vec2 uv = gl_FragCoord.xy / u_resolution;
  float t = (uv.x + uv.y) * 0.5;
  vec3 color = mix(vec3(0.0), vec3(1.0), t);
  gl_FragColor = vec4(color, 1.0);
}
Concept: This shader is our blank canvas. It converts screen coordinates into UV coordinates (normalized 0-1) and uses them to blend black and white into a simple gradient. It establishes a base on which we can build more complexity.
Code Explanation:
uvis a 2D coordinate between 0 and 1 across the screen.tcombines the x and y components into a scalar.mix()linearly blends two colors based ont.- The result is a soft black-to-white diagonal gradient.
- This setup is foundational and helps us visualize our coordinate space.

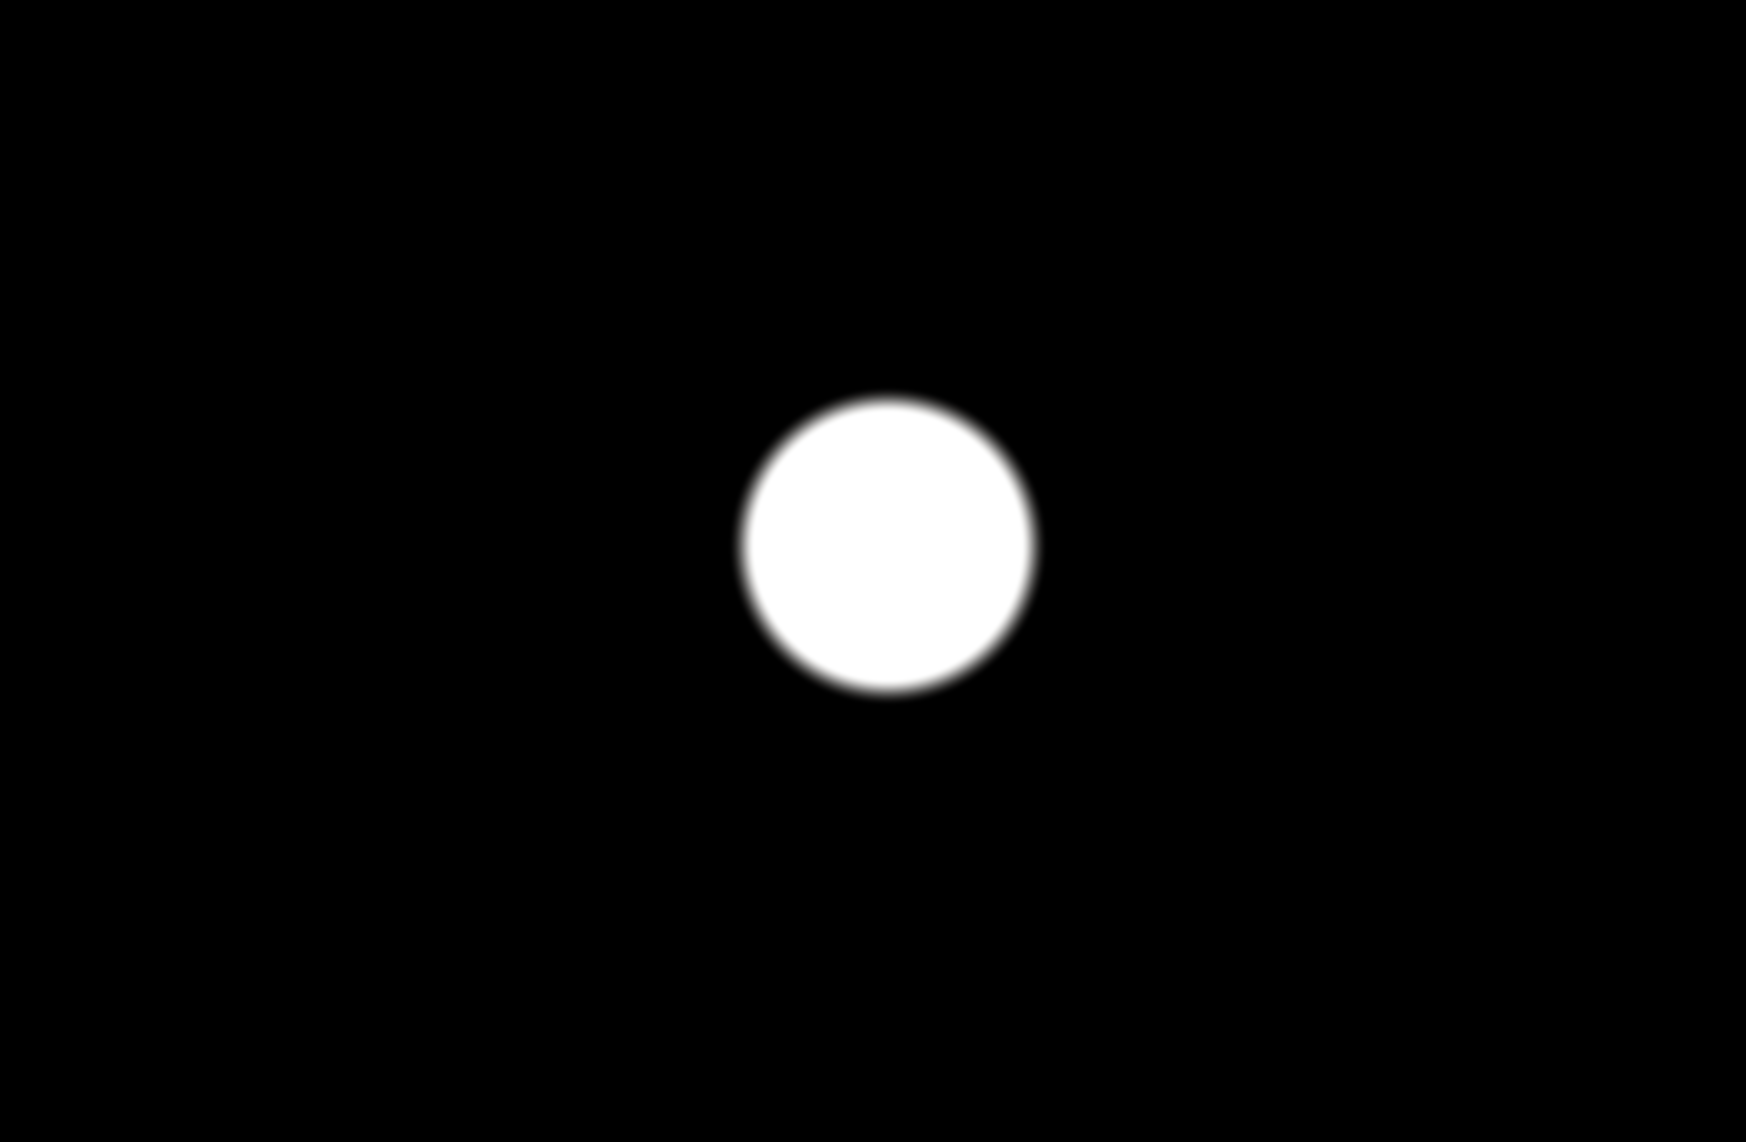
One Static Metaball
#ifdef GL_ES
precision mediump float;
#endif

uniform vec2 u_resolution;

void main() {
  vec2 center = u_resolution * 0.5;
  float radius = 80.0;
  float dist = length(gl_FragCoord.xy - center);
  float field = radius / dist;
  float fill = smoothstep(1.0, 1.2, field);
  vec3 color = mix(vec3(0.0), vec3(1.0), fill);
  gl_FragColor = vec4(color, 1.0);
}
Concept: A metaball is a visual representation of a field. The closer you are to the center, the higher the field strength. We can visualize this as a glowing circle.
Code Explanation:
- We calculate the center of the screen using
u_resolution. radiusdefines how large the metaball is.length()gives us the distance from the current pixel to the center of the metaball.field = radius / distcreates a stronger value near the center and weaker further away.smoothstep()softens the edges of the metaball, turning the sharp gradient into a soft glow.mix()blends black and white using the smoothed field as a mask.- Finally, the result is output with full opacity using
vec4(color, 1.0). - This is our first true metaball, glowing softly on the screen.
Multiple Animated Metaballs
#ifdef GL_ES
precision mediump float;
#endif

uniform vec2 u_resolution;
uniform float u_time;
uniform int u_numMetaballs;
uniform float u_hashSeed;

float hash(float n) {
  return fract(sin(n + u_hashSeed) * 43758.5453);
}

void main() {
  vec2 uv = gl_FragCoord.xy;
  vec2 center = u_resolution * 0.5;
  float field = 0.0;

  for (int i = 0; i < 100; i++) {
    if (i >= u_numMetaballs) break;
    float fi = float(i);

    float radius = mix(20.0, 90.0, hash(fi + 300.0));
    float freqX = mix(0.8, 1.8, hash(fi + 10.0));
    float freqY = mix(0.8, 1.8, hash(fi + 20.0));
    float ampX  = mix(80.0, 130.0, hash(fi + 30.0));
    float ampY  = mix(80.0, 130.0, hash(fi + 40.0));

    vec2 pos = center + vec2(
      sin(u_time * freqX + fi) * ampX,
      cos(u_time * freqY + fi) * ampY
    );

    float dist = length(uv - pos);
    field += radius / dist;
  }

  float fill = smoothstep(1.0, 1.2, field);
  vec3 color = mix(vec3(0.0), vec3(1.0), fill);
  gl_FragColor = vec4(color, 1.0);
}
Concept: We generate several metaballs and animate each one along a looping circular trajectory using sine and cosine functions. These individual metaballs interact with each other by contributing to a shared field function. This field accumulates the influence of each ball at every pixel, and when their areas overlap, the field values increase—leading to soft merging effects. This concept of summing fields is at the heart of how metaballs blend organically, rather than appearing as hard-edged circles.
Code Explanation:
hash()is used to generate pseudo-random values deterministically based on the index of the metaball. This keeps each one unique but reproducible.- For each metaball in the loop:
- We use
mix()to interpolate between a minimum and maximum value for each property:radius, horizontal and verticalfrequency, andamplitude. These are driven byhash()to ensure variation between blobs. posdetermines the current position of the metaball using a sine and cosine wave—tied tou_time—to create a smooth, circular movement.distmeasures how far the current pixel is from the metaball center.- Each metaball contributes
radius / distto the totalfield. Since many blobs may affect the same pixel, these field values accumulate, causing regions of stronger influence. - Finally,
smoothstep()applies a soft threshold around a value of 1.0, blending pixels where the field strength is near that threshold, creating glowing, organic shapes instead of crisp outlines.
- We use
Animated metaball on a black background, smoothly pulsing and morphing using real-time shader calculations.
Final Shader: Color, Lighting, and Advanced Effects
New concepts we will introduce to achieve the same esthetics as the one on top of the article:
- Dynamic Uniforms: We greatly expand the parameters our shader receives. This includes not just resolution or time, but also a full suite of customizable controls: color gradients for the background, minimum and maximum values for radius, amplitude, and frequency of blob movement, plus visual attributes like outline thickness and color animation amount. These uniforms provide flexibility and fine-tuning for generative expression.
- Color Animation: The background isn’t static anymore. Instead, it's animated over time using sine and cosine waves for each RGB component. This creates a subtly moving, dreamlike backdrop that enhances the organic feel of the metaballs.
- Accumulative Color: Each metaball no longer contributes just to the field strength—it also contributes its own unique color, generated using hash functions. These individual contributions are blended into a single color via accumulation and normalization, producing a smooth, multicolored cluster that shifts and evolves with time.
- Lighting Model: We estimate a gradient of the field by sampling slightly offset pixels. This gives us a vector representing the direction of strongest change—similar to a surface normal. We use this to compute highlights (specular lighting) and shadows, which add visual dimension and depth to the blobs.
- Outline Masking: The SDF (signed distance function) values from each metaball are smoothly blended using
smoothMin. We use the resulting minimum distance to generate an outline mask, letting us selectively fade the metaball cluster into the background around the edges.
The rest of this tutorial is available exclusively for members. Signing up is completely free, and it helps support more in-depth, beginner-friendly content like this.
If you're enjoying the tutorial so far, becoming a member means a lot—it lets me keep sharing creative coding resources without ads or clutter.
Plus, once you're in, you'll unlock the full advanced shader code, post-processing effects, and all the juicy details that bring this generative art piece to life.
Thanks for being here, and I hope to see you on the other side!