Learn Creative Coding: Build Geometric Abstract Art with p5.js

Hello friends, and welcome to a new creative coding tutorial! In this tutorial, we’re going to create a geometric abstract art piece using JavaScript and p5.js. This project is perfect for beginners in creative coding who are interested in exploring generative art techniques.
What We’re Going to Create
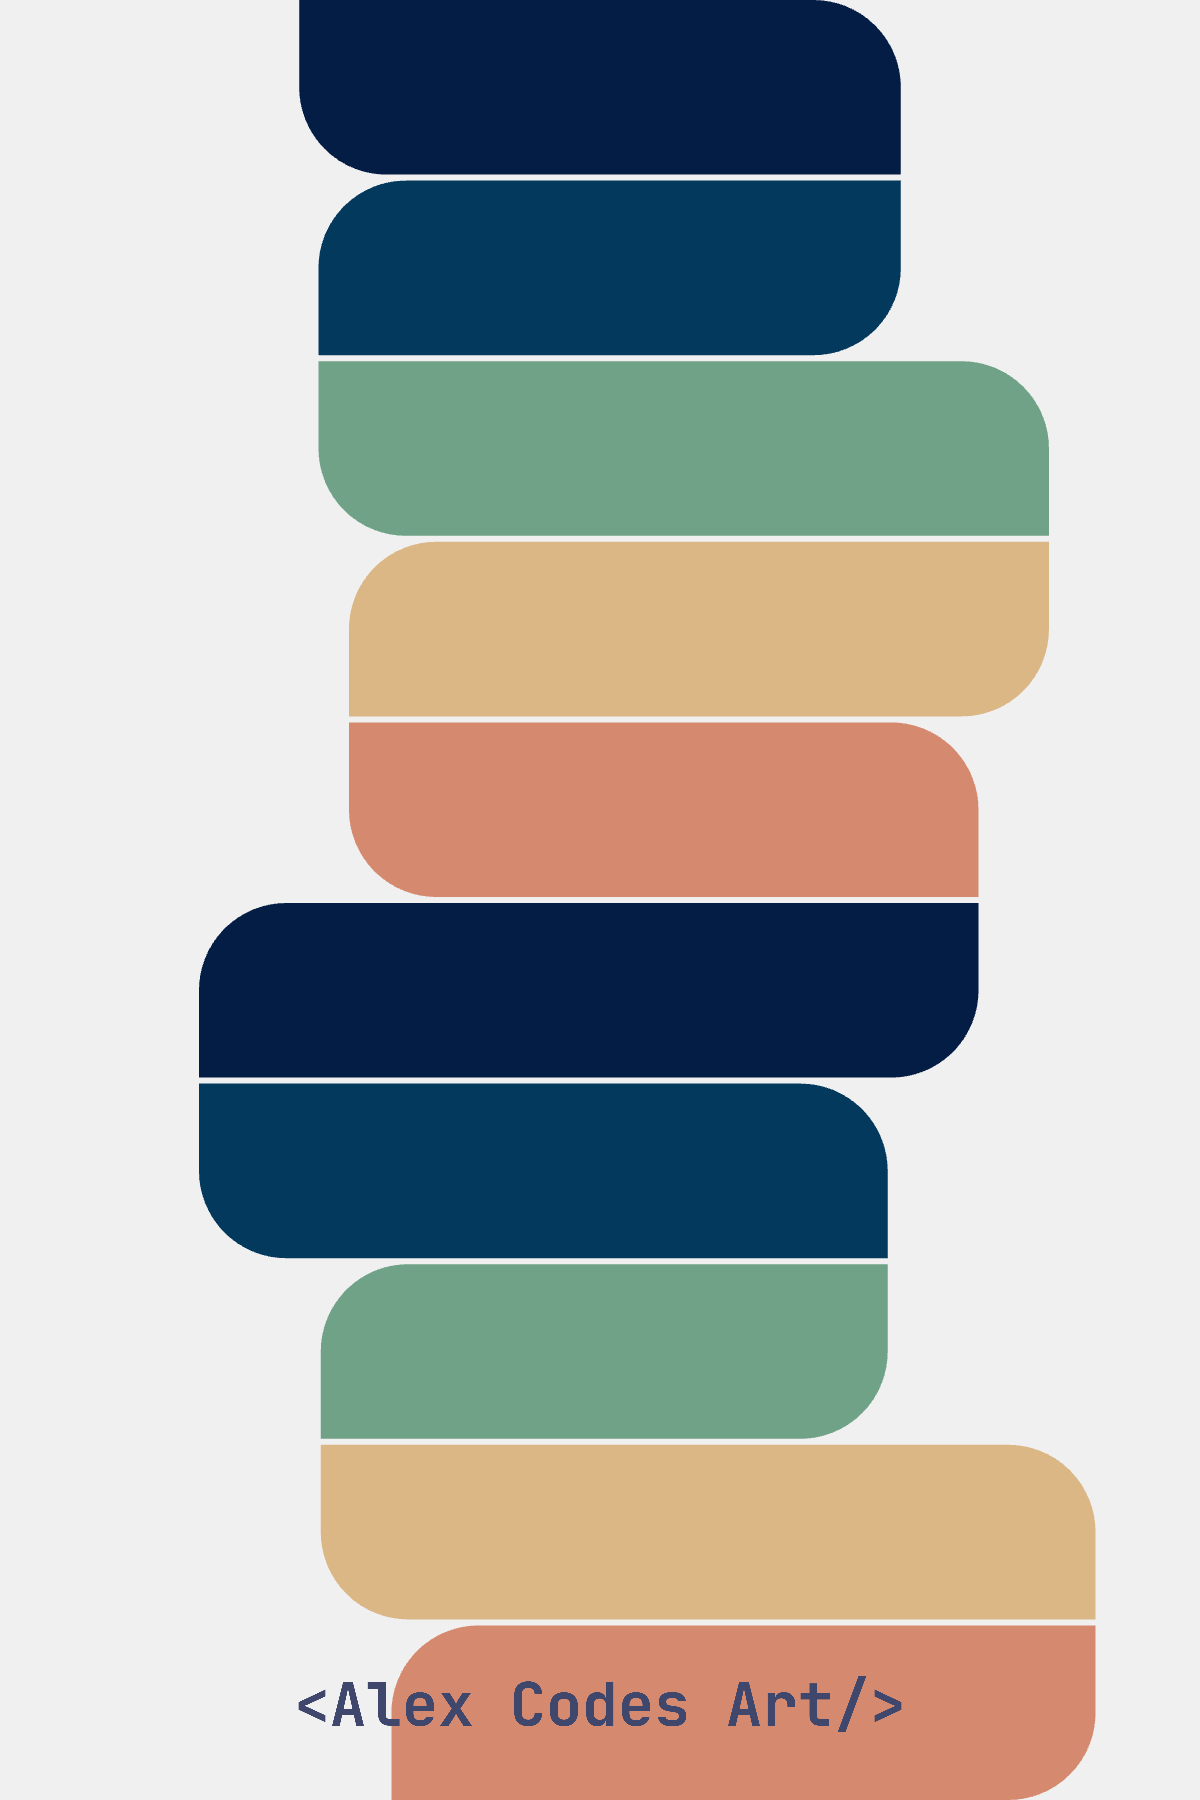
Take a look at the abstract art piece we’ll be making. This is an interactive piece so feel free to play around with the settings:
Breaking Down the Design
Let’s break down the steps to create this piece of abstract art with code:
- We’ll be working with rectangles that are aligned vertically.
- The rectangles are aligned either to the left or right, following the top rectangle’s position.
- The corners of the rectangles have varying radii depending on their alignment.
- The rectangles also vary in width, adding to the dynamic nature of the composition.
Setting Up Variables
To begin, we need to define several variables such as the number of items, spacing between them, border radius, and the minimum and maximum width of the rectangles. We’ll store these variables in a settings object:
let settings = {
  numberOfItems: 10,
  padding: 2,
  cornerRadius: 50,
  minWidth: 180,
  minWidthMax: 400,
  maxWidth: 260,
  maxWidthMax: 600,
}

let colors = ["#031d44","#04395e","#70a288","#dab785","#d5896f"];
Setting Up the Canvas
Next, let’s start with our setup function:
function setup() {
  createCanvas(400, 600);
  pixelDensity(3);

  rectMode(CORNERS);
  noStroke();
}
We’re using rectMode(CORNERS) to make it easier to align the rectangles based on the corners' x-y coordinates. This mode interprets the first two parameters of the rect() function as the top-left corner and the last two as the bottom-right corner.
Drawing the Rectangles
In the draw function, we’ll calculate the height of each rectangle and set a random width within the defined minimum and maximum range. We’ll also define default values for left and right alignment, which we’ll use for positioning the first item.
function draw() {
  background(240);

  let itemWidth = random(settings.minWidth, settings.maxWidth);
  let itemHeight = (height - ((settings.numberOfItems - 1) * settings.padding)) / settings.numberOfItems;

  let leftAlign = (width / 2) - (itemWidth / 2);
  let rightAlign = (width / 2) + (itemWidth / 2);

  drawRectangles(itemWidth, itemHeight, leftAlign, rightAlign);
}
Creating the drawRectangles Function
We’ve already called our drawRectangles function, so let’s create it next. Here’s what this function needs to do:
- Iterate over the number of items we defined.
- Translate vertically to the position of the current item.
- Define the fill color for each rectangle.
- Draw rectangles aligned to the left or right based on their index, with border radius applied to the correct corners.
- Update the left or right alignment for the next rectangle.
function drawRectangles(itemWidth, itemHeight, leftAlign, rightAlign) {
  for (i = 0; i < settings.numberOfItems; i++) {
    push();
    translate(0, (itemHeight + settings.padding) * i);

    fill(colors[i % colors.length]);

    if (i % 2 == 0) {
      rect(leftAlign, 0, leftAlign + itemWidth, itemHeight, 0, settings.cornerRadius, 0, settings.cornerRadius);
      rightAlign = leftAlign + itemWidth;
    } else {
      rect(rightAlign - itemWidth, 0, rightAlign, itemHeight, settings.cornerRadius, 0, settings.cornerRadius, 0);
      leftAlign = rightAlign - itemWidth;
    }

    itemWidth = random(settings.minWidth, settings.maxWidth);
    pop();
  }
}
Wrapping Up
🥳 That’s it! Congratulations on creating your own piece of generative abstract art with p5.js! This tutorial has guided you through some fundamental concepts of creative coding, and now you have a solid foundation to build upon.
If you enjoyed this tutorial and want to dive deeper into creative coding, be sure to check out our other tutorials on p5.js and JavaScript.
You can find the full code for this project
Stay Connected
Thank you for following along with this creative coding journey! If you have any questions, feedback, or want to share your own generative art creations, feel free to leave a comment below. I’m always here to help and would love to see what you’ve made.
Don’t forget to subscribe to this blog for more exciting tutorials and creative coding tips. Happy coding, and see you in the next tutorial!
Next Tutorial
In the next tutorial, we will create an interactive abstract art using p5.js. We will explore what classes are in JavaScript and how we can use them to better organise the code. See you there!


